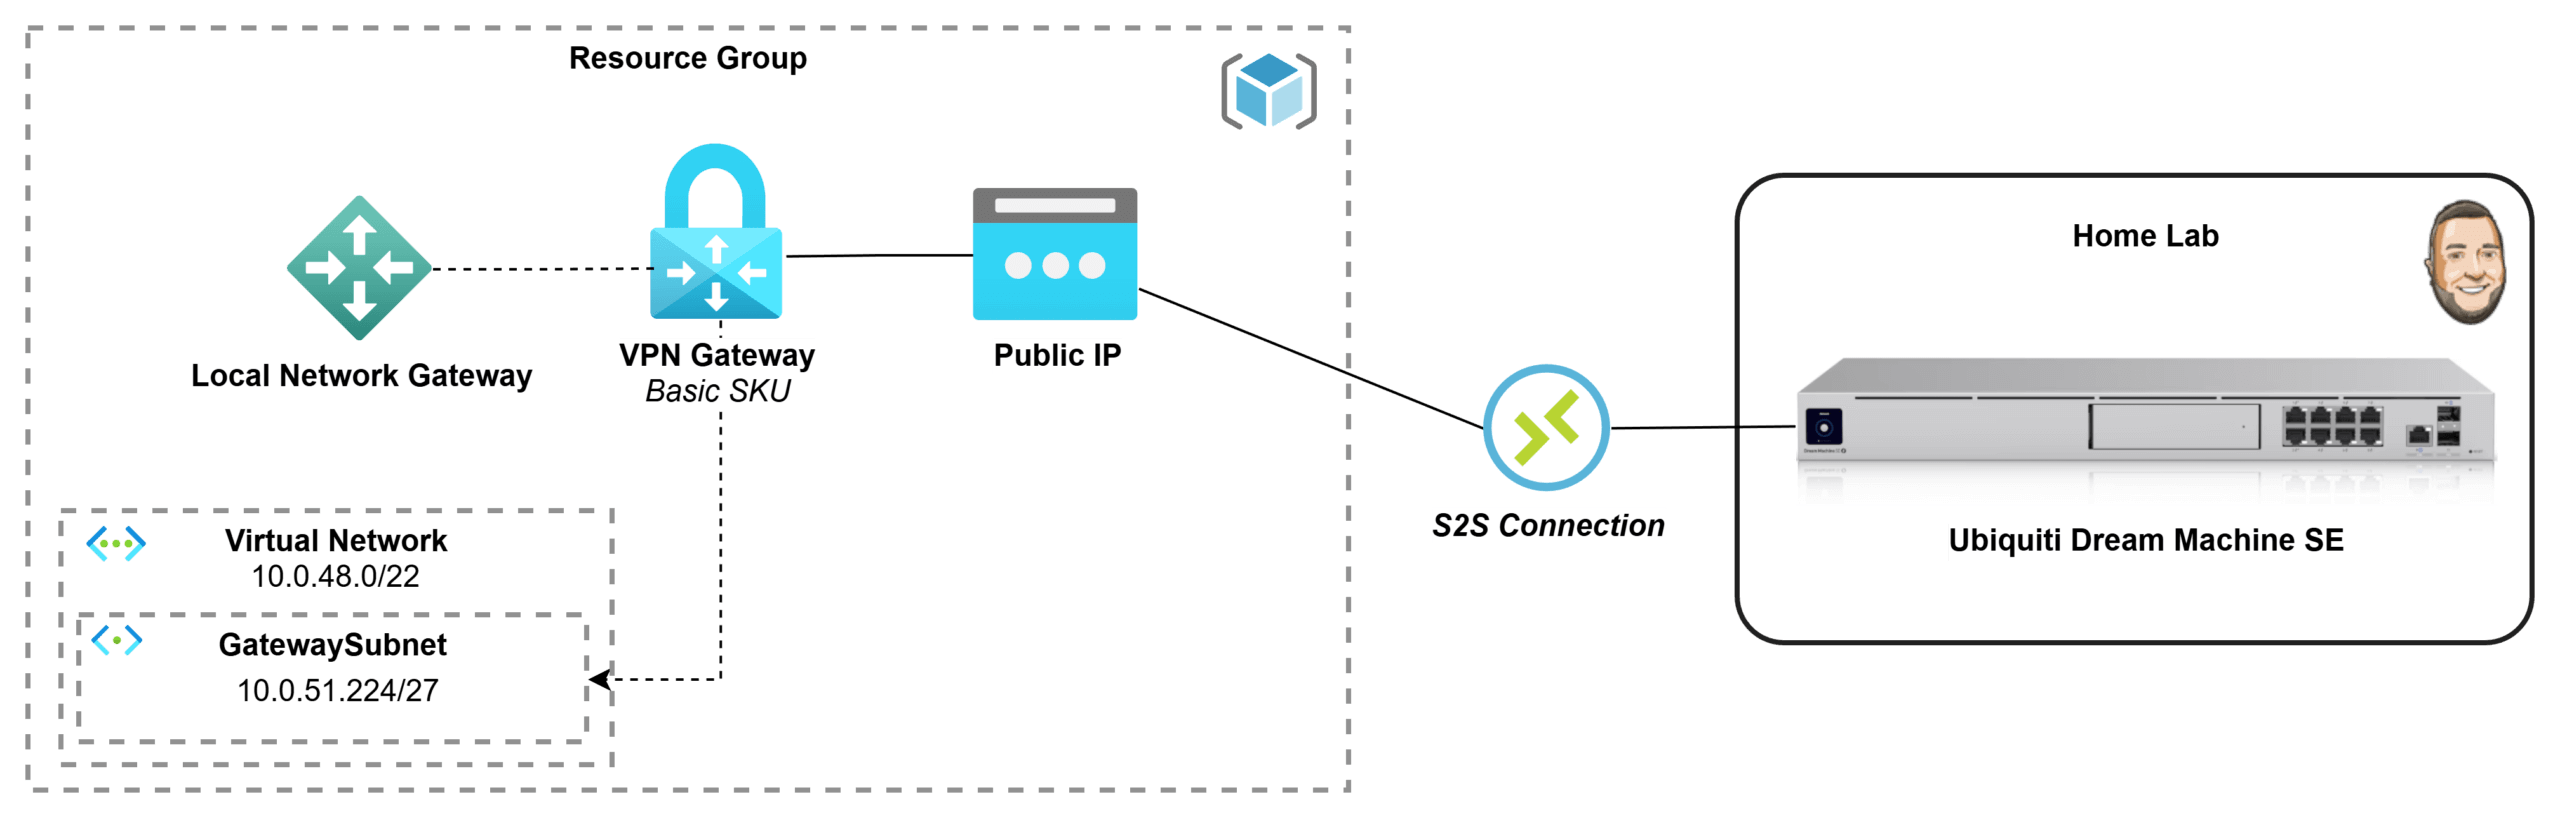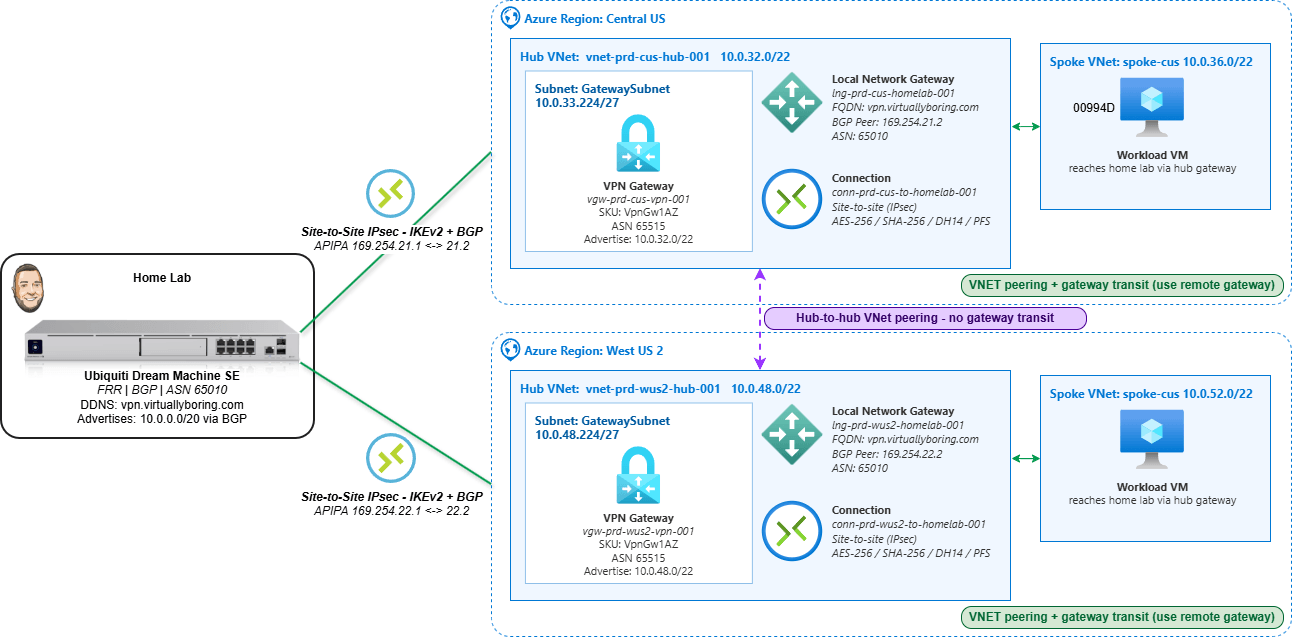
An Azure VPN Gateway is the managed service that terminates encrypted IPsec tunnels between Azure and a network outside it — in this case, a home lab. Deploy a dual-region Azure VPN Gateway — one in each of two Azure regions, pointing both back to the same on-prem device — and you get dual-region Site-to-Site connectivity: two independent encrypted paths from your hub VNets to home. New to VPN gateways? My single-region Azure VPN Gateway how-to walks through the basics first.
The reason to build it this way is resilience and routing. A single-region gateway is one tunnel and one point of failure; a gateway in Central US and West US 2 gives two regional paths. Pair that with BGP and the routing becomes self-healing — each side advertises its prefixes, and if one regional path drops, traffic converges onto the other without anyone editing a static route. That’s the difference between “a VPN that works” and “a VPN that keeps working when something breaks.”
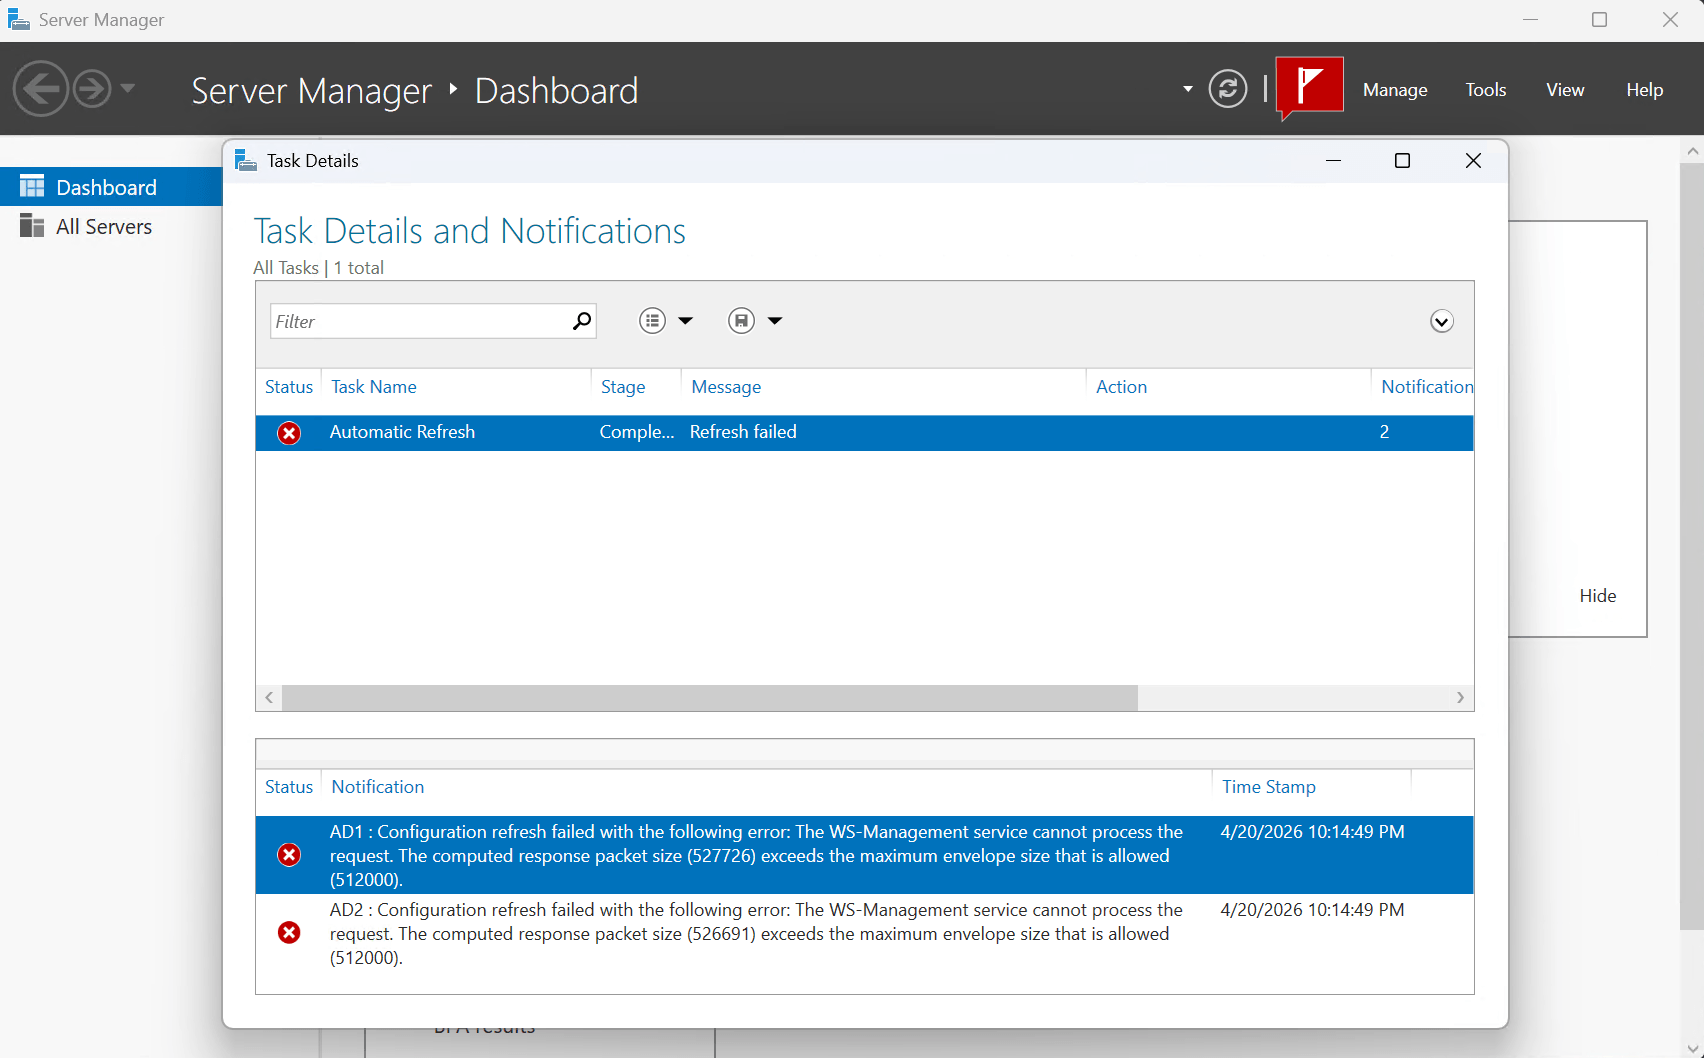
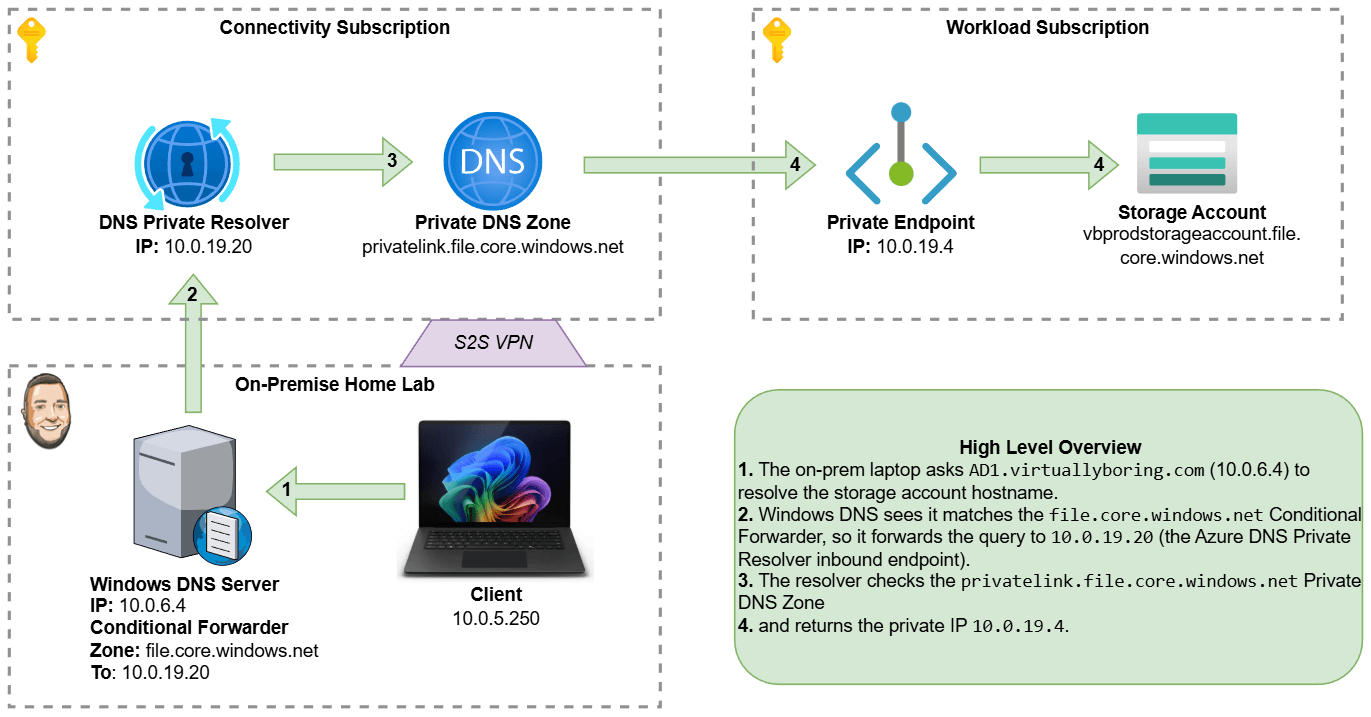
This is a portal-first walkthrough: every gateway, Local Network Gateway, and connection built by hand so the Azure object model is actually visible. I’ll cover all the settings, plus the two spots that trip people up most — pointing both regions at one DDNS name (fine here because my home lab sits behind a single ISP, so everything resolves back to one public IP), and getting BGP to actually come up over APIPA.
Dual-Region VPN Gateway vs. Azure Virtual WAN: which enterprise design fits?
Before you build anything, it’s worth knowing this isn’t the only enterprise-approved design for hybrid connectivity — and neither is “better” in the abstract. Both the dual-region VPN Gateway hub-and-spoke and Azure Virtual WAN are documented reference architectures in Microsoft’s Cloud Adoption Framework. Both eliminate single points of failure, both scale, and both route over the Microsoft backbone. The difference is who manages the hub and how far you need to scale.
What each one actually is:
- Dual-region VPN Gateway (what this post builds): A self-managed hub-and-spoke. You own the hub VNets, the gateways, the peerings, the route tables, and the gateway-transit settings. Redundancy is built in even here — an active-standby gateway is really two instances under the hood, and the zone-redundant
AZSKUs spread those instances across availability zones. Run one per region and a single region (or a single zone) failing doesn’t take you down. - Azure Virtual WAN: A Microsoft-managed hub. Microsoft runs the hub router, the inter-hub mesh, and the peerings for you. Each hub runs two active VPN gateway instances by default, and connecting a spoke automatically gives it transitive any-to-any routing — no manual gateway-transit toggles, no per-VNet peering sprawl.
Here’s the practical split:
| Consideration | Dual-region VPN Gateway (self-managed) | Azure Virtual WAN (managed) |
|---|---|---|
| Hub management | You own it | Microsoft-managed |
| Scale ceiling | Up to 100 tunnels per gateway (SKU-dependent); 500 peerings per VNet | Up to 1,000 VPN connections / 2,000 tunnels per hub, 20 Gbps aggregate, multiple hubs per region |
| Spoke-to-spoke / transit routing | You wire it manually (gateway transit, UDRs) | Built in and automatic |
| Branch / SD-WAN onboarding | Manual per site | Partner CPE auto-provisioning at scale |
| Best at | A handful of regions and spokes you want full control over | Global, many-region, many-branch networks |
| Operational overhead | Higher — every path is yours to configure | Lower — the hub is a service |